Before starting the integration, you should ensure that you have set-up and configured your Interface. For more information on this aspect, see our Configuration Guide.
Authorisation
In order to access your services via a Third Party Provider (TPP), the TPP initiates a consent request with tell.connect and we redirect the user to you for authentication. You will need to build an authorisation service, or (more likely) adapt an existing part of your application.
This section describes how your Authorisation Service should behave. When the service is available, you should set the location in the Management Console under Interface -> Integration (see the Configuration Guide for more details)
When tell.connect has authenticated the TPP and validated the request, the user will be redirected to your Authorisation Service with a consent-idappended as a querystring.
So if your Authorisation Service is located at
https://secure.alias-bank.com/ob-consent
then the redirect we perform will route to
https://secure.alias-bank.com/ob-consent?consent-id={consent-id}When this URL is invoked, you should do the following:
1. Get Consent
Call the GET /consent/{consent-id} endpoint and we will return all data associated with the consent which you should display to the user.
The data returned will be:
| scope | A comma separated list of permissions being requested, for example: - accounts:read,balance:read,transactions:read |
| tpp | The name of the TPP |
| app | The name of the TPP’s app |
| interface | The uuid of your Interface (useful if you are operating multiple Interfaces) |
| payinfo | If the consent relates to a Payment Initiation, this object will contain the payment request information. |
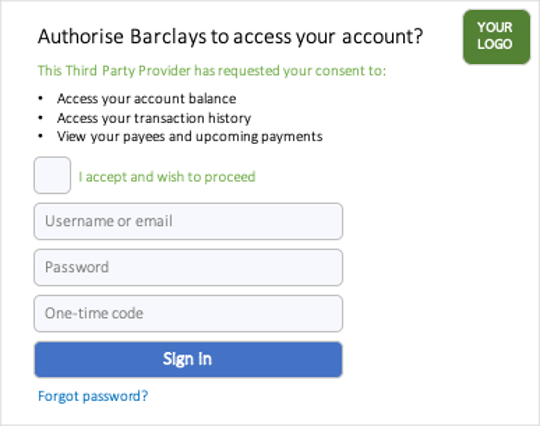
2. Display & Authenticate Consent Request
Using the data returned above, you should present your user with a page displaying the information.
If the request is for a payment, please ensure that you display the full payment request object so the user can review and verify that the details are correct. At this stage you can optionally verify that you would accept this payment, but this is not essential. You should not execute the payment at this stage (that will come later).
You should prompt the user to (a) agree to this consent and (b) confirm their identity (i.e. provide their login / SCA details) if they haven't just done so in order to arrive at this page. A typical web page may look something like this, but a mobile app would most likely utilise some form of biometrics – this is up to you to determine and design.
3. Post Outcome
After completing the authentication process, you should send the outcome to the POST /consent endpoint. This allows you to indicate if the request was successful (or not) and to provide a user-id. This can be any id from your system which we will use to identify that user in the future.
4. Post Redirect
If the response from the API call above contains alocation URL, you should redirect the user back to that location. If we return the location as "na" then no need to do anything - just display a friendly "all done" message and prompt the user to go back to the TPP site to continue their journey. (This variation is designed to support different journeys i.e. if the user began on a different device)
Resources
Users need a way to manage their consents. They have the right to review and revoke a consent at any time. To enable this, you need to create a page within your application which lists their consents and provides them the option to revoke / delete. You can present this in any way you choose – here is an example of how you may wish to arrange the page:
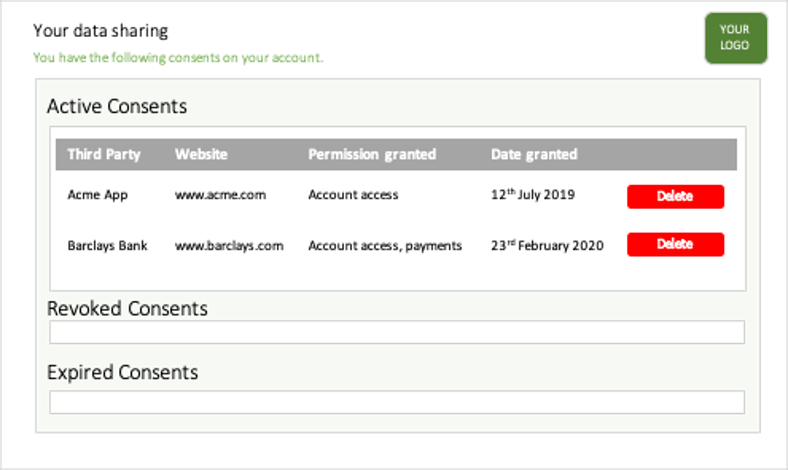
You don’t need to store any data or build any complex logic – just call the tell.connect API to get all consents.
1. Get All Consents
Call the GET /users/{user-id}/consentsendpoint to retrieve a list of consents for a given user.
2. Delete Consent
Call the DELETE /users/{user-id}/consents/{consent-id} endpoint to delete (or "revoke") an individual consent.
Resources
With an active Consent in place, a TPP can begin making requests to the tell.connect API on behalf of the user. This is where you come in again - the tell.connect engine maps incoming calls, validates TPP and consent status, then reaches out to your application for a response.
Security
You can check the source and validity of all requests from tell.connect using a combination of two methods; API Key and Message Signing.
Requests from tell.connect will always include an API Key in the Header. You can access your API Key by logging into the Management Console and viewing your Interface Security Settings.
--header 'x-api-key: 6d0b32a2-b607-4749-b910-f641ad347f3f'
If you have assigned a Certificate to your Interface (see the Configuration Guide for more details), requests will also include a signed JWT in the header.
--header 'x-jws-signature: eyJhbGciOiJIUzI1NiIsInR5cCI6IkpXVCIsImFwcCI6IjM0OTdkNzRmLTk2YzktNDMzZi1hYzZiLTZiZmY1N2EyNzIyYyIsInBhdGgiOiIvYXV0aG9yaXNlIiwiaWF0IjoxNjAxMjA1MjA1MzUyfQ.eyJpbnRlcmZhY2UiOiI5MzVmNmU2Yy02ZTAyLTRkM2ItOGRjOS1kYWM4ZmJlMjViMTYiLCJzY29wZSI6ImFpc3AiLCJ1dWlkIjoiMTM3ZWE1MDUtY2NmYy00YmM2LWEyM2EtYmY3OTNkMmI5ZDc4In0.eMPbORKbpQAlRPG7ethQOGUPvy9ivCZqZGCsHuIVfWQ'
For general information on how to validate JWTs, see https://jwt.io/. In our case, a JWT is comprised of a standard header:
{"alg": "HS256","typ": "JWT"}a payload in the format described below e.g.
{"request_header": {"uuid": "0f4a5515-7b8b-4a9e-aed3-6a7ba1c7e975", "endpoint": "GET /accounts/{account-id}/balance", "userid": "295744778411-1"},"request_body": {"account_no": "19745674"}}and a signature, signed in accordance with the JWT specification using the Interface Certificate.
Process Request
After receiving and authenticating a request, you need to parse the JSON object body. The object consists of two elements;
- request_header – this contains information about the request itself
- request_body – this contains any further information you may need to fulfil the request
request_header
The request_header, within a JSON object, will always contain 3 items:
- uuid – this is a unique value generated by tell.connect to identify an individual request
- endpoint – this is the type of request that has been made e.g. GET /accounts
- user-id – this is the value that you provided when the user initially gave consent
{"uuid": "0f4a5515-7b8b-4a9e-aed3-6a7ba1c7e975","endpoint": "GET /accounts/{account-id}/balance","userid": "295744778411-1"}request_body
The request_body, within the JSON object, contains any further information you may need to fulfil the request. For many requests, this will be empty. However, it may contain qualifying criteria which may be relevant to this type of call.
{"account_no": "19745674"}Complete JSON object
So, in this example, the full JSON object will be:
{"request_header": {"uuid": "0f4a5515-7b8b-4a9e-aed3-6a7ba1c7e975","endpoint": "GET /accounts/{account-id}/balance","userid": "295744778411-1"},"request_body": {"account_no": "19745674"}}Build your Response
You should now have everything you need to process the request. Once complete, you should format your response as described below. Full details for specific request and response formats can be found in the Resource Schemasection.
HTTP Status Codes
You only need to return one of four possible http status codes:
- 200 represents success and should be accompanied by a relevant JSON body object
- 400 is used if you are unable to fulfil the request but can provide a “handled” reason. For example, if an account is closed then you may choose to return a rejection response indicating “account is inactive”. These responses must be accompanied by a JSON Object describing the “error”. If you return a 400 code, tell.connect will pass on this code and your error message directly back to the TPP. An example is:
{"error": "account is inactive"} - 404 indicates that the object (e.g. an account) cannot be found. No response body is required
- 500 should be used for any unhandled errors. If possible, the response can be accompanied by a JSON Object describing the “error”, but this isn’t mandatory. If you return a 500 code, tell.connect will return that status to the TPP but will not display the error description
Response Body
Except where you are returning a 404 HTTP Status Code (see above), you should construct a valid JSON object and return it in the body of the response. See below for valid response schema.
Resource Schema
GET Accounts
To retrieve a set of accounts associated with a User
Request
request_header
| Key | XPath | Format | Description |
|---|---|---|---|
| uuid | request_header->uuid | String | A unique reference for this request. |
| endpoint | request_header->endpoint | String | GET /accounts |
| user-id | request_header->user-id | String | This is the value that you provided when the user initially gave consent |
Response
| Key | XPath | Format | Description |
|---|---|---|---|
| account_no | [array]->account_no | string | A value which will be used in all subsequent calls identifying an account or sub-account. Typically, an eight-digit number, but this can be anything |
| name | [array]->name | string | A textual value you use to identify the account. This might be a person’s name, a nickname etc |
Retrieve Account Balance
To retrieve the balance (or balances) of an account-id specified in the path
Request
request_header
| Key | XPath | Format | Description |
|---|---|---|---|
| uuid | request_header->uuid | String | A unique reference for this request. |
| endpoint | request_header->endpoint | String | GET /accounts/{account-id}/balance |
| user-id | request_header->user-id | String | This is the value that you provided when the user initially gave consent |
Response
| Key | XPath | Format | Description |
|---|---|---|---|
| available | available | integer | Primary balance which should be expressed in the currency of the account, as an integer to two decimal points |
Retrieve Account Transactions
To retrieve a list of transactions associated with an account-id specified in the path
Request
request_header
| Key | XPath | Format | Description |
|---|---|---|---|
| uuid | request_header->uuid | String | A unique reference for this request. |
| endpoint | request_header->endpoint | String | GET Accounts/{account-id}/transactions |
| user-id | request_header->user-id | String | This is the value that you provided when the user initially gave consent |
request_body
| Key | XPath | Format | Occurrence | Description |
|---|---|---|---|---|
| to | request_body->to | Integer | 0..1 | The request_body may contain a “to” value which indicates the transaction up to which the results should run. If no “to” value is provided, you should return the most recent 50 transactions (or fewer if there are fewer than 50 transactions available) for the account in question. If a “to” value is provided, you should return 50 transactions up to but not including the transaction with the id provided in the “to” field. |
Response
| Key | XPath | Format | Description |
|---|---|---|---|
| id | [array]->id | integer | A unique id for the user/transaction – this will be used to filter/paginate should more transactions be required for viewing |
| date | [array]->date | YYYY-MM-DD hh:mm:ss | Date of the transaction |
| merchant | [array]->merchant | String | The external party sending / receiving funds |
| amount | [array]->amount | integer | The amount as an integer to two decimal points, indicated as positive for a credit and negative for a debit |
Retrieve Account Payees
To retrieve a list of payees (sometimes known as “beneficiaries”) associated with theaccount-id specified in the path
Request
request_header
| Key | XPath | Format | Description |
|---|---|---|---|
| uuid | request_header->uuid | String | A unique reference for this request. |
| endpoint | request_header->endpoint | String | GET /accounts/{account-id}/payees |
| user-id | request_header->user-id | String | This is the value that you provided when the user initially gave consent |
Response
| Key | XPath | Format | Description |
|---|---|---|---|
| payee_id | [array]->payee_id | integer | A reference to the payee – this will be used to uniquely identify the payee for the account, and should be used when managing this payee in future |
Create Account Payee
To save a new payee (sometimes known as “beneficiary”) to the account-id specified in the path
Request
request_header
| Key | XPath | Format | Description |
|---|---|---|---|
| uuid | request_header->uuid | String | A unique reference for this request. |
| endpoint | request_header->endpoint | String | POST /accounts/{account-id}/payees |
| user-id | request_header->user-id | String | This is the value that you provided when the user initially gave consent |
request_body
| Key | XPath | Format | Description |
|---|---|---|---|
| payee_name | request_body->payee_name | String | A textual name used to identify the payee |
| account_no | request_body->account_no | String | Account number of the payee |
Response
| Key | XPath | Format | Description |
|---|---|---|---|
| payee_id | [array]->payee_id | integer | A reference to the payee – this will be used to uniquely identify the payee for the account, and should be used when managing this payee in future |
Delete Account Payee
To delete an existing payee (specified by payee-id in the path) from theaccount-id specified in the path
Request
request_header
| Key | XPath | Format | Description |
|---|---|---|---|
| uuid | request_header->uuid | String | A unique reference for this request. |
| endpoint | request_header->endpoint | String | DELETE /accounts/{account-id}/payees/{payee-id} |
| user-id | request_header->user-id | String | This is the value that you provided when the user initially gave consent |
Response
No response body is required – simply return the appropriate HTTP Status Code.
View Account Direct Debits
To retrieve a list of direct debits associated with the account-id specified in the path
Request
request_header
| Key | XPath | Format | Description |
|---|---|---|---|
| uuid | request_header->uuid | String | A unique reference for this request. |
| endpoint | request_header->endpoint | String | GET /accounts/{account-id}/direct-debits |
| user-id | request_header->user-id | String | This is the value that you provided when the user initially gave consent |
Response
| Key | XPath | Format | Description |
|---|---|---|---|
| payee_id | [array]->payee_id | integer | A reference to the payee – this will be used to uniquely identify the payee for the account, and should be used when managing this payee in future |
| payee_name | [array]->payee_name | integer | A reference to the payee – this will be used to uniquely identify the payee for the account, and should be used when managing this payee in future |
Create Payment
To execute the payment associated with this access token
Request
request_header
| Key | XPath | Format | Description |
|---|---|---|---|
| uuid | request_header->uuid | String | A unique reference for this request. |
| endpoint | request_header->endpoint | String | POST /payment |
| user-id | request_header->user-id | String | This is the value that you provided when the user initially gave consent |
request_body
| Key | XPath | Format | Description |
|---|---|---|---|
| payee-id | request_body->payee-id | String | this may be provided if you have enabled "pay with payee-id" |
| payeeinfo | request_body->payeeinfo-id | Object | this may be provided if you have enabled "pay with payee details" and will include further details relating to the type of payment you have enabled, including; - name - address - account_no - sort_code - iban - bic_swift - bank_name - bank_address |
| amount | request_body->amount | Decimal | the amount expressed in the currency of the account, as an integer to two decimal points |
| reference | request_body->reference | String | a textual reference to associate with the payment |
| scheduledate | request_body->scheduledate | Date | A date in format YYYY-MM-DD which indicates when the payment should be made. May be current date. Will be omitted/blank if the payment marked as “recurrent” |
| recurrence | request_body->recurrence | Object | this is an object which describes the recurrence with which the payment should be made (i.e. for a standing order). If included, it may contain: - regularity (daily, weekly, monthly, annually) - ondate - start_date - end_date |
Response
| Key | XPath | Format | Description |
|---|---|---|---|
| payment_reference | [array]->payment_reference | integer | An ID to uniquely reference this payment in the future |
Testing
When a TPP registers on your Dedicated Interface, they will be issued with a client_id and client_secret in order to securely access the API, and they will be required to sign their requests using a shared certificate.
You don't have to go through this process. You can access the API in Sandbox instantly by using the phrasesandbox in place of:
- username - used for Basic Auth in certain calls
- password - used for Basic Auth in certain calls
- JWT - used to sign requests in the x-jws-signature header